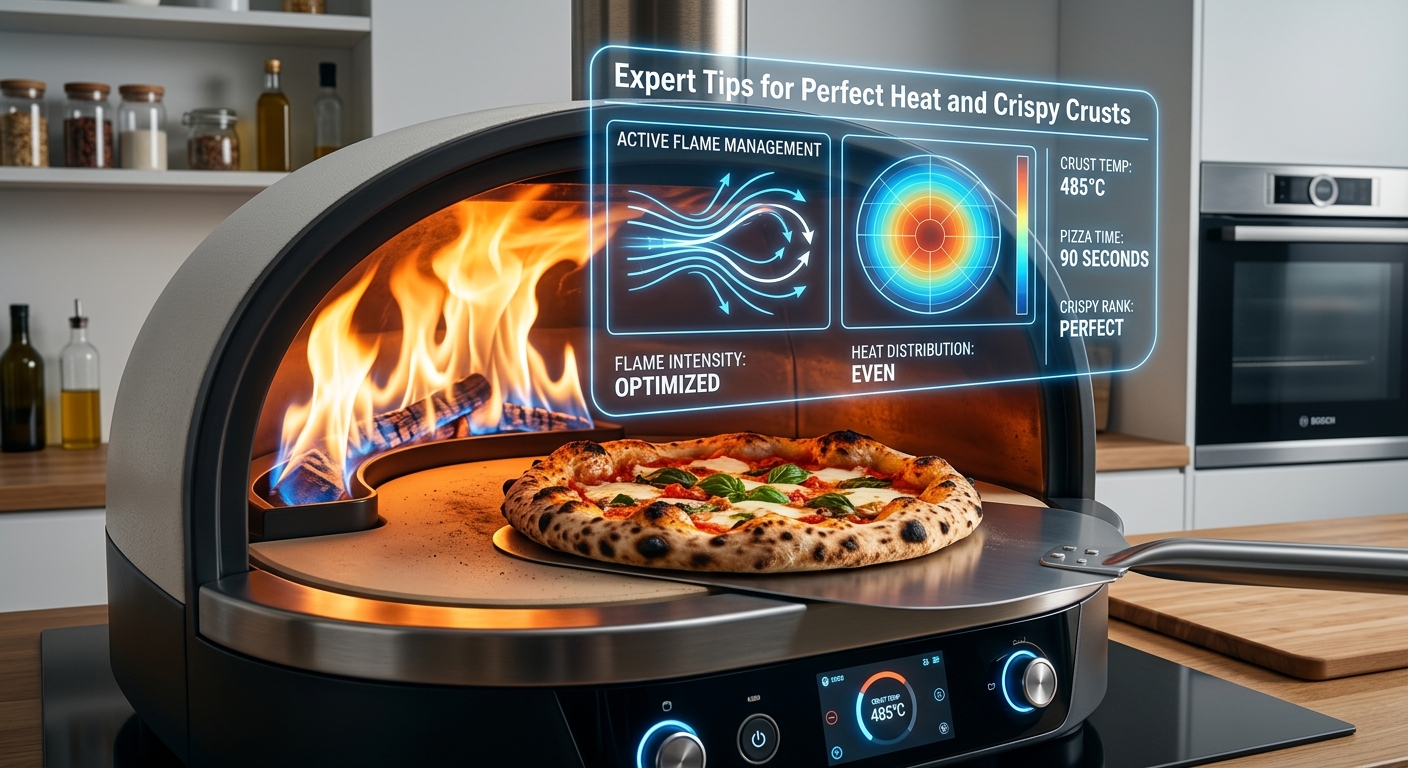
Mastering the pizza oven flame is the secret ingredient that separates a good pizza from an extraordinary one. Whether you’re using a wood-fired brick oven, a gas-powered model, or even a portable pizza oven, understanding how to control and manage the flame directly impacts the cooking temperature, heat distribution, and ultimately, the crust and toppings of your pizza. This guide will equip you with the knowledge to achieve that perfect Neapolitan-style char, a crispy base, and evenly cooked toppings, transforming your pizza-making experience from amateur to artisan.
The dance between dough, heat, and fire is a delicate one. Too much flame can scorch the crust before the inside is cooked, while too little can result in a pale, undercooked base. Achieving the ideal pizza oven flame management requires an understanding of heat transfer, fuel types, and the nuances of your specific oven. It’s about creating a consistent, radiant, and convective heat environment that mimics the intense, rapid cooking of traditional pizzerias.
Key Takeaways
- Flame position is crucial: For wood-fired ovens, the flame should typically be moved to the side or back after the initial heat-up to create a balanced cooking environment.
- Temperature is king: Aim for specific temperature ranges (400-500°C or 750-930°F) for authentic Neapolitan pizzas, monitored with an infrared thermometer.
- Fuel quality matters: Use dry, seasoned hardwood for wood-fired ovens to produce a clean, hot flame and minimal smoke.
- Heat soak is essential: Allow your oven to preheat thoroughly to ensure the dome and floor retain and radiate heat effectively.
- Airflow control is key: Adjust vents or the oven door to regulate oxygen supply, influencing flame intensity and combustion.
- Observation is your best tool: Learn to read the flame color and behavior to gauge temperature and adjust your technique.
- Practice makes perfect: Consistent practice with your specific oven is the most reliable way to master flame management.

Credit: www.labalaba.com
Understanding Pizza Oven Heat Dynamics
Before diving into flame management, it’s essential to grasp how pizza ovens generate and distribute heat. Most high-temperature pizza ovens, particularly wood-fired ones, rely on a combination of three heat transfer methods: conduction, convection, and radiation.
Conduction: The Oven Floor’s Role
Conduction is the transfer of heat through direct contact. In a pizza oven, this primarily occurs between the hot oven floor (or deck) and the pizza dough. A well-heated stone or brick floor is crucial for achieving a crispy, evenly cooked base. The floor absorbs intense heat from the fire and then transfers it directly to the bottom of the pizza. Without sufficient conduction, the crust can become soggy or pale.
Convection: The Circulating Heat
Convection is the transfer of heat through the movement of fluids, in this case, hot air and gases. In a pizza oven, the flame and hot gases circulate around the cooking chamber, carrying heat to the pizza’s toppings and the sides of the crust. For a wood-fired oven, the chimney draft plays a significant role in driving this convection. Proper airflow ensures that heat reaches all parts of the pizza evenly.
Radiation: The Flame’s Intense Glow
Radiation is the transfer of heat through electromagnetic waves, much like the sun warming the Earth. The flame itself is a powerful source of radiant heat, directly cooking the top of the pizza. The hot dome of the oven also radiates heat downwards onto the pizza. This intense radiant heat is what allows pizzas to cook so quickly in high-temperature ovens, creating the characteristic leopard-spotting (charring) on the crust.
Types Of Pizza Ovens And Their Flame Characteristics
The type of pizza oven you use will significantly influence how you manage its flame. Each has unique characteristics and requires specific techniques.
Wood-fired Ovens
Wood-fired ovens are the traditionalists, relying on burning hardwood to generate intense heat. The flame is dynamic and requires constant attention.
- Flame Behavior: The flame in a wood-fired oven is generated by burning wood. Initially, you build a large fire to heat the oven’s thermal mass (dome and floor). Once the oven reaches temperature, the wood is often pushed to the side or back. The flame then becomes more of a persistent, licking fire rather than a roaring blaze, providing radiant and convective heat.
- Fuel: The type and dryness of the wood are paramount. Seasoned hardwood like oak, maple, or fruitwoods burns hotter and cleaner, producing fewer embers and less smoke. Green or wet wood creates a weak, smoky flame and can make temperature regulation difficult.
- Temperature Control: Achieving and maintaining consistent high temperatures (often exceeding 400°C / 750°F) is key. This is done by managing the amount of wood added and controlling airflow.
- Flame Management Technique: After the initial heat-up, the goal is to move the main fire to the side or rear of the oven. This creates a hot spot for cooking while allowing the oven floor to maintain a stable temperature. You’ll need to periodically add small pieces of wood to keep the flame alive and maintain temperature.
Gas-fired Ovens
Gas ovens offer more predictable heat and easier temperature control, making them popular for both home and commercial use.
- Flame Behavior: Gas ovens use burners (typically propane or natural gas) to produce a flame. This flame is usually more consistent and easier to adjust than a wood fire. The burner can be positioned under the deck, at the rear, or in the dome.
- Fuel: Propane or natural gas.
- Temperature Control: Temperature is adjusted via a thermostat or control knob, regulating the gas flow to the burner.
- Flame Management Technique: The primary task is setting the desired temperature and ensuring the burner ignites correctly and maintains that temperature. Some models allow for adjustment of flame height or position to optimize heat distribution. You might need to rotate pizzas more frequently to ensure even cooking due to potentially less radiant heat from the dome compared to a wood-fired oven.
Electric Ovens
Electric ovens are the simplest to operate, relying on heating elements to generate heat.
- Flame Behavior: There is no “flame” in the traditional sense. Heat is generated by electric coils.
- Fuel: Electricity.
- Temperature Control: Controlled by a thermostat.
- Flame Management Technique: Primarily involves setting the correct temperature and ensuring even heat distribution, often achieved by rotating the pizza. Some electric ovens have upper and lower heating elements that can be controlled independently.
Portable Pizza Ovens
These compact ovens, often fueled by wood pellets, propane, or charcoal, are designed for outdoor use and rapid heating.
- Flame Behavior: Varies by fuel type. Pellet ovens have a unique flame pattern from the burning pellets. Propane models mimic gas ovens on a smaller scale. Charcoal ovens use glowing coals.
- Fuel: Wood pellets, propane, charcoal.
- Temperature Control: Often achieved by adjusting fuel input or airflow.
- Flame Management Technique: Requires careful monitoring of fuel levels and airflow. For pellet ovens, keeping the hopper filled and ensuring the pellets are burning efficiently is key. For propane, maintaining consistent gas flow is important.
Credit: bestburnfirewood.com
Mastering The Wood-fired Oven Flame
Wood-fired ovens are where flame management truly shines, offering the most authentic pizza-making experience but also demanding the most skill.
The Importance Of Heat Soak
Before you even think about cooking, heat soak is paramount. This is the process of allowing the oven to reach and maintain its target temperature for a significant period.
- Duration: For a typical brick or refractory dome oven, this can take anywhere from 1 to 3 hours, depending on the oven’s size, insulation, and construction material.
- Goal: The goal is to saturate the oven’s thermal mass, the floor and dome, with heat. This stored heat is then radiated back onto the pizza, ensuring a crispy crust and evenly cooked toppings. A quick preheat will result in a pale, undercooked pizza.
- Indicators: The dome should turn clear (white or grey) as soot burns off, and the floor should reach the desired temperature.
Building And Managing The Fire
The initial fire-building phase is crucial for reaching optimal temperatures.
- Start Small: Begin with small, dry kindling and gradually add larger pieces of seasoned hardwood.
- Build the Blaze: Create a substantial fire, allowing it to burn vigorously for at least 30-60 minutes to heat the dome and floor.
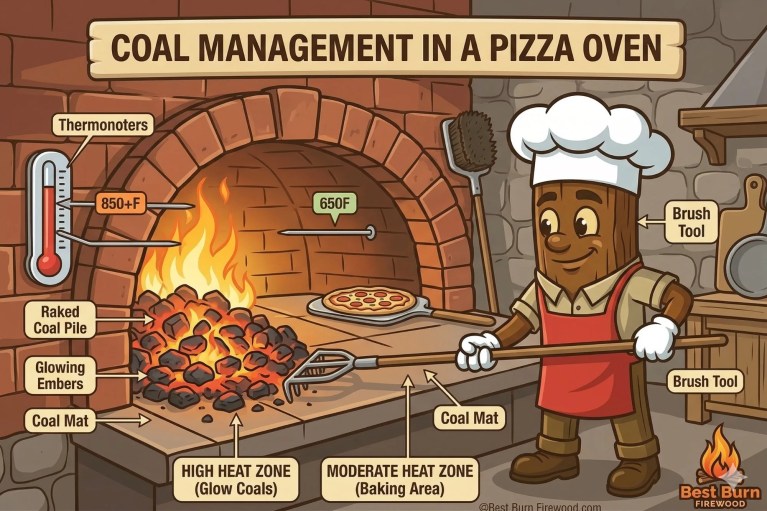
- Move the Fire: Once the oven is thoroughly heated (indicated by a clear dome and hot floor), use a metal peel or rake to push the burning logs and embers to one side or the back of the oven. This creates a cooking zone with radiant heat from the dome and convective heat from the residual flames, while the floor remains intensely hot for conduction.
- Maintain the Flame: Add small, dry pieces of hardwood periodically to the side fire to keep it alive and maintain the oven’s temperature. You are aiming for a consistent, licking flame, not a raging inferno.
Reading The Flame: Color As An Indicator
The color of the flame provides valuable real-time feedback on the oven’s temperature and combustion efficiency.
- Bright Yellow/Orange Flames: Indicate lower temperatures and incomplete combustion. This is often seen when the wood is still drying or the oven isn’t fully preheated.
- Clear, White Flames: Signify very high temperatures and efficient combustion. This is the ideal state for cooking pizzas.
- Red Embers: Show that the wood is burning hot and providing sustained heat.
Airflow Control: The Damper And Door
Airflow is the engine of combustion. Controlling it allows you to manage the flame’s intensity.
- Damper: If your oven has a damper (usually near the chimney), opening it fully during the heat-up phase allows for maximum airflow to build a strong fire. Once the oven is hot and the fire is moved, you might partially close the damper to regulate the burn rate and retain heat.
- Oven Door: Leaving the door slightly ajar during the initial heat-up can also aid airflow. Once cooking, the door can be used to control heat loss and manage the flame. Leaving it fully open exposes the oven to more drafts, potentially making the flame too active. Closing it partially can mellow the flame and help the dome retain heat.
Pro Tip: In my experience, a slightly open door during cooking, especially when the flame is primarily on the side, helps create a gentle convection current that cooks the toppings without burning the crust.

Credit: www.oldemillinn.com
Gas Oven Flame Management
Gas ovens simplify flame control, but understanding their specific dynamics is still important for optimal results.
Burner Placement And Types
Gas ovens come with various burner configurations:
- Deck Burners: Located beneath the cooking deck, providing primary heat for the floor.
- In-Dome Burners: Positioned within the oven dome, these provide more direct radiant heat to the toppings and help heat the dome itself.
- Rear Burners: Often found at the back of the oven, offering a combination of radiant and convective heat.
Setting And Maintaining Temperature
Most gas ovens have a thermostat or control knob.
- Preheat Thoroughly: Just like wood-fired ovens, gas ovens require adequate preheating. Set the thermostat to your desired temperature and allow the oven to reach it fully. This ensures the deck and dome are hot enough.
- Monitor with an Infrared Thermometer: While the thermostat indicates the air temperature, an infrared thermometer is invaluable for checking the actual deck temperature. Aim for 400-500°C (750-930°F) for Neapolitan-style pizzas.
- Adjust as Needed: If the temperature drops during cooking, especially after multiple pizzas, you may need to slightly increase the burner setting. Conversely, if the deck becomes too hot, you might need to reduce it.
Flame Appearance In Gas Ovens
The flame in a gas oven should ideally be a consistent blue with possibly some yellow tips, indicating efficient combustion.
- Troubleshooting: If the flame is predominantly yellow and flickers erratically, it could indicate a gas pressure issue or a dirty burner. Consult your oven’s manual or a professional.
Using The Door For Heat Control
Similar to wood-fired ovens, the door on a gas oven can be used to manage heat.
- Open Door: Allows for more direct radiant heat and can help achieve faster cooking times, similar to a wood-fired oven. This is often preferred for Neapolitan-style pizzas.
- Closed Door: Traps heat, leading to more even, sustained cooking but potentially a less charred crust. This might be better for styles requiring longer bake times.
The Role Of Airflow And Oxygen
Oxygen is the lifeblood of any fire. Controlling its supply is fundamental to managing flame intensity and temperature.
Air Intake Vents
Many pizza ovens, especially wood-fired and some gas models, have adjustable air intake vents.
- Purpose: These vents control the amount of oxygen entering the combustion chamber.
- Heat-up Phase: Open vents fully to provide ample oxygen for a strong, hot fire.
- Cooking Phase: Partially closing vents can reduce the fire’s intensity, making the flame more stable and preventing overheating. This is especially useful in wood-fired ovens to transition from a roaring fire to a steady heat source.
Chimney Draft (wood-fired Ovens)
The chimney creates a draft that pulls air into the oven and expels exhaust gases.
- Strong Draft: Achieved with a well-designed chimney and an open damper. This fuels a hotter fire but can also draw heat out too quickly if not managed.
- Regulating Draft: Partially closing the damper or using the oven door can reduce the draft, slowing combustion and helping the oven retain heat.
Impact On Flame And Heat
- More Oxygen: Leads to a hotter, more vigorous flame and faster combustion. This is good for initial heat-up but can lead to scorching if not controlled during cooking.
- Less Oxygen: Results in a weaker, cooler flame and slower combustion. This can help maintain a steady temperature but might not reach the extreme heat needed for rapid pizza cooking if the initial heat-up was insufficient.
Essential Tools For Flame Management
Having the right tools makes a significant difference in your ability to control and monitor your pizza oven.
Infrared Thermometer
This is arguably the most critical tool for any serious pizza oven user.
- Function: Measures surface temperature remotely by detecting infrared radiation.
- Application: Essential for checking the deck temperature (the cooking surface) and the dome temperature. This provides a much more accurate picture of the heat available for cooking than an oven’s built-in thermometer, which often measures air temperature.
- Target Temperatures: For Neapolitan pizza, aim for a deck temperature between 400-500°C (750-930°F) and a dome temperature that is at least as hot, if not hotter.
Oven Thermometer (built-in)
Many ovens come with a built-in thermometer, usually located in the door or dome.
- Function: Measures the ambient air temperature inside the oven.
- Usefulness: Provides a general indication of the oven’s heat but is less precise for the cooking surface than an infrared thermometer. It’s useful for the initial heat-up phase.
Peels (turning And Launching)
These long-handled tools are indispensable for placing pizzas in and out of the oven and for rotating them during cooking.
- Launching Peel: Typically made of metal or wood, used to slide the pizza onto the hot oven deck.
- Turning Peel: Smaller and often made of metal, used to rotate the pizza inside the hot oven without having to remove it. This is crucial for even cooking, especially in ovens with a strong heat source on one side.
Rakes And Ash Tools (wood-fired Ovens)
Specific tools for managing the wood fire.
- Rakes: Used to move logs, embers, and ash around within the oven. Essential for consolidating the fire to one side after heating.
- Ash Pan/Brush: For cleaning out excess ash that can hinder airflow and heat.
Heat-resistant Gloves
Protecting your hands is vital when working with high temperatures.
- Material: Look for gloves made of leather or specialized heat-resistant fabrics.
- Purpose: Allows you to safely adjust logs, manage the fire, and retrieve tools from the oven.
Common Pitfalls And How To Avoid Them
Even with the best intentions, beginners often encounter challenges when managing pizza oven flames.
Pitfall 1: Insufficient Heat Soak
- Problem: Trying to cook before the oven is fully preheated. The dome and floor haven’t stored enough heat.
- Result: Pale, soggy crust; toppings undercooked.
- Solution: Patience is key. Allow adequate time for heat soak (1-3 hours for wood-fired ovens). Use an infrared thermometer to confirm the deck is at the target temperature.
Pitfall 2: Overly Aggressive Flame
- Problem: Maintaining a roaring fire throughout the cooking process.
- Result: Pizza burns on the crust before toppings are cooked; uneven cooking.
- Solution: After the initial heat-up, reduce the flame intensity. Push the fire to the side in wood-fired ovens. Adjust gas burners or airflow to a more moderate setting. Learn to recognize the difference between a “heating” flame and a “cooking” flame.
Pitfall 3: Uneven Heat Distribution
- Problem: One side of the pizza cooks much faster than the other.
- Result: Burnt edge on one side, undercooked on the other.
- Solution: Rotate the pizza frequently using a turning peel. In wood-fired ovens, ensure the fire is positioned to provide balanced radiant and convective heat. In gas ovens, consider if the burner placement is optimal or if rotating more often is needed.
Pitfall 4: Using Wet Or Unseasoned Wood (wood-fired Ovens)
- Problem: Burning damp wood.
- Result: Smoky, low flame; difficulty reaching high temperatures; excessive creosote buildup.
- Solution: Always use dry, seasoned hardwood (moisture content below 20%). Store wood in a dry place, ideally elevated off the ground.
Pitfall 5: Poor Airflow Management
- Problem: Vents closed too tightly during heat-up, or open too wide during cooking.
- Result: Difficulty reaching temperature, or flame burning too fiercely and erratically.
- Solution: Understand your oven’s vents and damper. Open fully for heat-up, then adjust to maintain a steady cooking temperature. Observe the flame: a choked flame (too little air) will be weak and smoky; an uncontrolled flame (too much air) will be erratic and potentially burn fuel inefficiently.
Advanced Techniques For Perfect Pizza
Once you’ve mastered the basics, these techniques can elevate your pizza-making even further.
Creating A “roller Coaster” Heat Profile
This technique, particularly for wood-fired ovens, involves managing the flame to create distinct heat zones.
- Initial Blast: Heat the oven intensely with a large fire.
- Moderate Cook: Push the fire to the side, allowing the dome and floor to stabilize.
- Final Sear: Briefly move the pizza back towards the residual flames or embers for a final charring and “oven spring” effect on the crust. This requires precise timing and quick maneuvering.
Managing Topping Cook Time
The flame management directly affects how toppings cook.
- High Radiant Heat: Cooks toppings quickly, often resulting in nicely blistered vegetables or slightly charred cheese edges.
- Moderate Convection: Ensures toppings are cooked through without burning.
- Balancing Act: If toppings are browning too fast, you might need to lower the heat slightly or move the pizza away from the direct flame. If they’re not cooking, ensure the dome is hot enough and there’s sufficient convective heat.
The Importance Of Dough Hydration
Dough hydration interacts with oven heat. Wetter doughs tend to cook faster and require more intense heat from the deck to prevent sogginess. Drier doughs might tolerate slightly lower temperatures but can become tough if overcooked. Understanding your dough recipe and matching it with appropriate flame management is key.
Case Study: The Home Pizza Enthusiast’s Journey
Mark, a passionate home cook, invested in a mid-sized wood-fired pizza oven. Initially, his pizzas were a mixed bag: some burnt, some undercooked. He struggled with managing the fire, often letting it die down too quickly or keeping it too aggressive.
- Challenge: Inconsistent temperatures and scorched crusts.
- Solution: Mark committed to understanding the heat soak process. He started dedicating 1.5-2 hours to preheating, using his infrared thermometer religiously to track the deck temperature. He learned to maintain a consistent, licking flame on the side after the initial heat-up, adding small pieces of oak every 15-20 minutes. He also practiced using his turning peel to rotate pizzas every 45-60 seconds.
- Result: Within a few weeks, Mark was consistently producing pizzas with perfectly puffed, leopard-spotted crusts and evenly cooked toppings. His pizzas went from “home-baked” to “pizzeria-quality.” He credits consistent practice and precise temperature monitoring with his success.
Data-driven Comparison: Oven Types And Heat Characteristics
To illustrate the differences in heat management,

As the author of the “Ultimate Pizza Guide: Recipes, Tips & Secrets Revealed,” I’m dedicated to sharing my love for pizza and empowering others to create delicious homemade pizzas with ease. Join me on a journey to uncover the secrets to perfecting your pizza game!