“Pizza Oven Insulation Condition Review”
The allure of a perfectly blistered crust, the smoky aroma, and the sheer joy of cooking outdoors, a pizza oven brings a touch of authentic Italian culinary magic to any backyard. Whether you’ve opted for a wood-fired marvel, a gas-powered convenience, or a hybrid design, one crucial element often dictates its performance and longevity: pizza oven insulation. This unsung hero plays a vital role in heat retention, fuel efficiency, and overall cooking consistency. Without proper insulation, your oven will struggle to reach and maintain the high temperatures needed for authentic pizza, leading to longer cooking times, uneven results, and wasted fuel.
Understanding the importance of insulation is the first step towards mastering your pizza oven. It’s not just about the initial build or purchase; it’s about ongoing maintenance and condition review. Regularly assessing your oven’s insulation ensures it operates at peak performance, saving you time, money, and the frustration of a less-than-perfect pizza. This review will guide you through the essential aspects of pizza oven insulation, from its fundamental principles to practical inspection techniques and common issues, empowering you to keep your oven in top condition for years of delicious pizzas.
Key Takeaways
- Insulation is critical for pizza ovens, directly impacting heat retention, fuel efficiency, and cooking temperature consistency.
- Ceramic fiber blankets and calcium silicate boards are the most common high-temperature insulation materials.
- Regular visual inspections are key to identifying cracks, gaps, or signs of degradation in the insulation.
- Material degradation can occur due to extreme temperatures, moisture, physical impact, and improper curing.
- Common insulation issues include crumbling, delamination, moisture absorption, and thermal bridging.
- Repairing insulation often involves using refractory mortar, specialized sealants, or replacing damaged sections.
- Preventative measures like proper curing, weather protection, and careful operation significantly extend insulation life.

Credit: www.amazon.com
The Science Behind Pizza Oven Insulation
At its core, pizza oven insulation is about thermal management. Pizza ovens need to reach and sustain extremely high temperatures, often exceeding 750°F (400°C), to cook Neapolitan-style pizzas in 60-90 seconds. This requires a highly efficient system for trapping and retaining heat within the oven dome and hearth. Insulation materials achieve this by minimizing heat transfer through conduction, convection, and radiation.
Conduction, Convection, And Radiation
- Conduction is the transfer of heat through direct contact. For example, heat from the fire transfers to the oven walls. Insulation materials with low thermal conductivity resist this direct transfer.
- Convection is the transfer of heat through the movement of fluids (like air or smoke). In a pizza oven, hot air and gases circulate. Insulation helps to contain this hot air within the cooking chamber.
- Radiation is the transfer of heat through electromagnetic waves. The fire and hot dome radiate heat. While some radiation is necessary for cooking, excessive radiative loss means less heat is available for baking.
Why High Temperatures Demand Specialized Insulation
Unlike a conventional home oven, which operates at much lower temperatures and prioritizes even heat distribution over extreme retention, a pizza oven thrives on intense, concentrated heat. The dome of a wood-fired oven, for instance, acts as a thermal battery, absorbing heat from the fire and then radiating it back down onto the pizza.
The hearth also needs to retain enough heat to cook the base of the pizza without burning it.
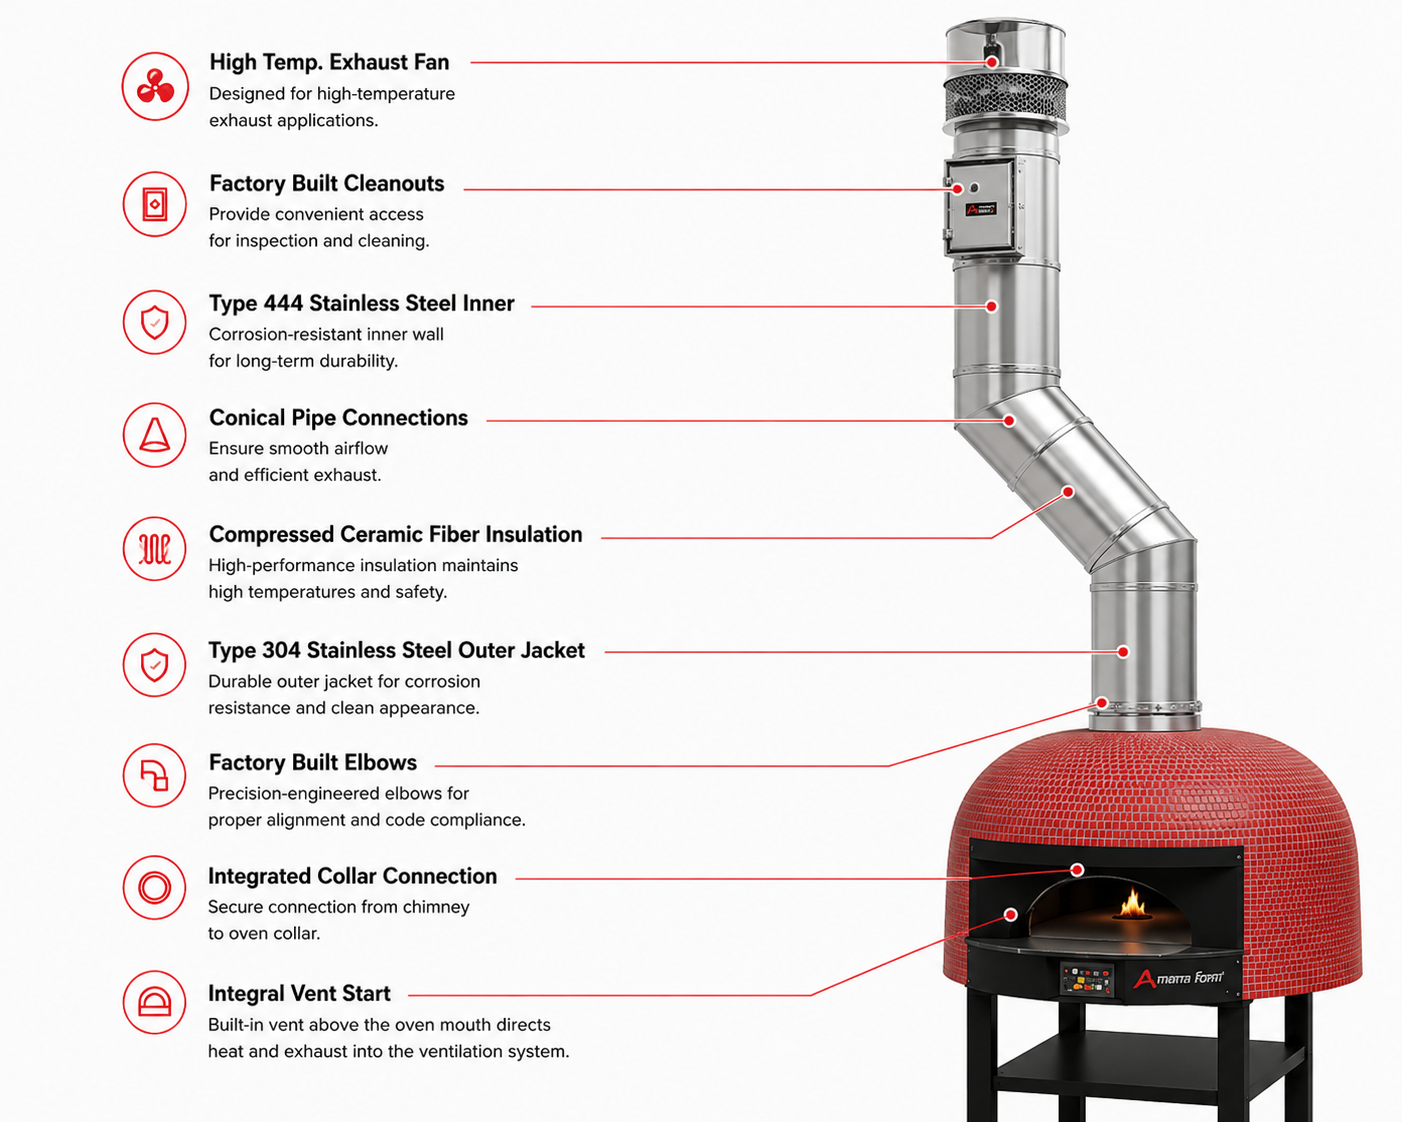
Materials used in home ovens, like fiberglass or mineral wool, would simply burn or degrade at pizza oven temperatures. This necessitates the use of refractory and high-temperature insulation materials specifically designed to withstand these extreme conditions. These materials are typically made from materials like silica, alumina, or zirconia, which have very high melting points and low thermal expansion.
Credit: marraforni.com
Common Pizza Oven Insulation Materials
The choice of insulation material significantly impacts an oven’s performance, durability, and ease of maintenance. While many ovens have a primary refractory layer for direct heat contact, an insulating layer is crucial for efficiency.
Ceramic Fiber Blankets (superwool, Kaowool)
Ceramic fiber blankets are a popular choice for their excellent thermal insulation properties, lightweight nature, and flexibility. They are manufactured by melting high-purity materials like alumina and silica and then spinning or blowing them into fine fibers, which are then compressed into flexible blankets.
- Pros:
- Very low thermal conductivity, providing excellent heat retention.
- Lightweight, reducing structural load.
- Flexible, allowing them to conform to curved surfaces like oven domes.
- Resistant to thermal shock.
- Cons:
- Can be brittle and susceptible to physical damage if not protected.
- Fibers can become airborne during installation, requiring appropriate personal protective equipment (PPE).
- Can degrade over time with prolonged exposure to very high temperatures or moisture.
Calcium Silicate Boards
Calcium silicate boards are rigid, pre-formed insulation panels made from calcium silicate, reinforced with cellulose fibers. They offer good thermal insulation and structural integrity.
- Pros:
- Rigid and durable, offering better protection against physical impact than blankets.
- Good thermal insulation properties, though generally not as high as ceramic fiber blankets.
- Easy to cut and shape for installation.
- Resistant to moisture and chemicals.
- Cons:
- Heavier than ceramic fiber blankets.
- Less flexible, making them more challenging to fit on curved surfaces without cutting into smaller pieces.
- Can be more expensive than some blanket options.
Refractory Mortar And Vermiculite/perlite Mixes
While not primary insulation in the same way as blankets or boards, refractory mortar mixed with lightweight insulating aggregates like vermiculite or perlite can form an insulating layer, often used as a secondary layer or for filling voids.
- Pros:
- Can be custom-molded to complex shapes.
- Provides a solid, monolithic insulating layer when cured.
- Relatively inexpensive when using perlite or vermiculite.
- Cons:
- Lower insulation value compared to dedicated ceramic fiber or calcium silicate products.
- Requires proper curing to achieve full strength and insulation properties.
- Can be prone to cracking if not mixed or applied correctly.
Conducting A Pizza Oven Insulation Condition Review
Regularly inspecting your pizza oven’s insulation is essential for maintaining its performance and preventing costly repairs. This review process should be systematic and thorough.
Visual Inspection: The First Line Of Defense
The most straightforward way to assess your insulation is through a visual inspection. This should be done when the oven is cool and clean.
- Dome Exterior: Look for any cracks, crumbling, or areas where the outer protective layer (stucco, brick, etc.) Has failed, exposing the insulation beneath. Small hairline cracks in stucco are often cosmetic, but larger fissures or crumbling indicate potential issues.
- Hearth and Floor: Check the hearth for cracks or unevenness. While the hearth’s primary function is cooking, the insulation beneath it is crucial for maintaining floor temperature.
- Door Opening: The area around the door is a common point of heat loss. Inspect the insulation seal here. Is it intact, or are there gaps?
- Internal Dome: If accessible (some ovens have removable liners or inspection ports), check the interior insulation for signs of spalling (surface flaking), cracking, or discoloration that might indicate overheating or moisture issues.
Checking For Gaps And Voids
Heat escapes most readily through gaps and voids.
- Around Structural Elements: Pay close attention to areas where different materials meet, such as where the dome meets the base, or around any structural supports.
- Penetrations: If your oven has any chimney flues or other penetrations, ensure the insulation is sealed tightly around them.
Assessing Material Integrity
Beyond visible damage, consider the integrity of the insulation material itself.
- Crumbling: If you tap on an area of exposed insulation and it crumbles easily, its structural integrity has likely been compromised. This can be due to age, repeated thermal cycling, or moisture damage.
- Soft Spots: Feel for any unusually soft or spongy areas, which might indicate moisture retention or degradation.
- Delamination: In layered insulation systems (e.g., blanket over board), check if the layers are separating.
Probing For Hidden Damage
Sometimes, damage isn’t immediately apparent.
- Gentle Probing: Use a non-metallic tool (like a wooden dowel or plastic probe) to gently probe suspect areas. If the probe sinks in easily or encounters significant resistance, it can indicate a problem.
- Tap Test: Tapping on the oven’s exterior can sometimes reveal hollow spots or areas where the insulation has detached from the refractory dome, though this is more applicable to the outer layers.

Credit: thelogcompany.com
Common Pizza Oven Insulation Problems And Solutions
Even with the best materials and installation, pizza oven insulation can develop problems over time. Understanding these issues is key to effective troubleshooting and repair.
Cracking And Spalling
This is perhaps the most common issue. Cracks can form due to thermal expansion and contraction, settling of the oven structure, or impact. Spalling is the flaking or chipping of the surface, often caused by rapid heating of a damp material or extreme temperature fluctuations.
- Solution:
- Minor Cracks: Small hairline cracks in the outer protective layer can often be repaired with a flexible, high-temperature sealant or stucco patch. For cracks in the insulation itself, refractory mortar or a specialized ceramic fiber cement can be used.
- Larger Cracks/Spalling: These may require more extensive repair. If the underlying insulation is damaged, it might need to be carefully removed and replaced with new material, followed by a fresh layer of refractory mortar or cement. Ensure any repaired areas are slowly and carefully cured to prevent new cracks from forming.
Moisture Absorption And Damage
Insulation materials, especially porous ones like vermiculite/perlite mixes or even ceramic fiber if not properly protected, can absorb moisture from rain, snow, or condensation. When this wet insulation is heated rapidly, the trapped moisture turns to steam, expanding rapidly and causing cracking, spalling, or even structural failure.
- Solution:
- Drying: If the oven is damp, allow it to air dry thoroughly for several days, ideally in warm, dry weather.
- Curing: When firing the oven after suspected moisture ingress, do so very slowly and gradually. Start with small fires for extended periods to allow moisture to escape gently. A typical initial cure might involve several hours of low heat over a few days.
- Prevention: The best solution is prevention. Ensure your oven has adequate weather protection, such as a good quality cover, or is built under a protective roof or shelter. Sealing the exterior with a breathable, water-resistant sealant can also help.
Material Degradation And Crumbling
Over many years of intense heat cycles, insulation materials can degrade. Ceramic fiber blankets can become less dense and lose some of their insulating capability. Mortar-based insulations can become brittle and crumble.
- Solution:
- Top-Up/Patching: For minor degradation, areas can sometimes be patched with fresh refractory mortar or cement.
- Replacement: In cases of significant degradation, sections of the insulation may need to be carefully removed and replaced. This is a more involved repair, often requiring specialized skills, especially if the structural integrity of the dome is compromised.
Thermal Bridging
Thermal bridging occurs when a material with higher thermal conductivity bypasses the insulation, creating a pathway for heat to escape. This can happen if there are gaps in the insulation, or if structural elements (like metal supports or dense refractory bricks) are not properly insulated from the heat source.
- Solution:
- Fill Gaps: Ensure all gaps between insulation layers and around structural elements are meticulously filled with appropriate high-temperature sealant or mortar.
- Insulate Supports: If your oven has metal supports or framework, ensure they are adequately insulated from the hot zones. Using insulating board or blanket material around these components can prevent heat loss.
Maintenance And Preventative Measures
The best way to deal with insulation issues is to prevent them from occurring in the first place. Proactive maintenance can significantly extend the life of your pizza oven’s insulation.
Proper Curing
This is arguably the most critical step for any new oven build or repair involving refractory materials or insulation. Curing is a slow heating process that drives out residual moisture and allows the binders in the materials to fully set and harden.
- Initial Cure: For a new oven or after significant repairs, follow the manufacturer’s or builder’s specific curing instructions. Typically, this involves building a series of progressively larger and hotter fires over several days. A common schedule might look like:
- Day 1: Small fire for 2-3 hours.
- Day 2: Medium fire for 3-4 hours.
- Day 3: Larger fire for 4-5 hours, reaching higher temperatures.
- Importance: Skipping or rushing the cure can lead to cracks and structural damage later on, as trapped moisture creates internal pressure when heated.
Weather Protection
Protecting your oven from the elements is paramount, especially in climates with significant rainfall, snow, or freeze-thaw cycles.
- Covers: Invest in a high-quality, breathable, waterproof cover for your oven when it’s not in use. Ensure the cover fits snugly but allows for some air circulation to prevent moisture buildup.
- Shelter: If possible, position your oven under a permanent shelter, such as a patio roof, gazebo, or dedicated oven enclosure.
- Sealing: Apply a breathable, water-repellent sealant to the exterior render or brickwork periodically. This helps prevent water penetration without trapping internal moisture.
Careful Operation
How you use your oven also affects its insulation.
- Avoid Extreme Temperature Shock: While pizza ovens are designed for high heat, avoid sudden, drastic temperature changes where possible. For example, don’t douse a scorching hot oven with cold water.
- Manage Fuel: Use appropriate fuel (seasoned hardwood for wood-fired ovens) and manage the fire effectively. Over-firing or creating excessively intense flames directly against the insulation can accelerate degradation.
- Cleanliness: Regularly clean out ash and debris from the oven floor. While ash itself isn’t usually damaging, accumulated debris can affect airflow and heat distribution.
Regular Inspections
Incorporate insulation checks into your regular oven maintenance routine. A quick visual inspection before and after firing, and a more thorough check annually, can catch minor issues before they become major problems.
Case Study: Revitalizing A Backyard Wood-fired Oven
John, a passionate home cook, had built his own wood-fired pizza oven three years prior. Initially, it performed brilliantly, reaching 900°F (480°C) within an hour and producing incredible pizzas. However, over the last year, he noticed it was taking much longer to heat up, and struggled to maintain consistent temperatures, especially on windy days.
His pizzas were taking 3-4 minutes to cook, rather than the desired 90 seconds.
The Initial Assessment
John decided it was time for an insulation condition review. He waited for a cool, dry day and performed a thorough visual inspection. He noticed significant cracking in the stucco exterior, particularly around the dome’s apex and the entrance. Upon closer inspection, some of these cracks revealed crumbling insulation material beneath. He also felt a distinct coolness radiating from the area around the chimney flue, suggesting a potential gap.
Identifying The Core Issues
Based on his observations, John identified several key problems:
- Cracked Stucco: The primary protective layer had failed in several areas, exposing the insulation.
- Crumbling Insulation: The ceramic fiber blanket layer, likely weakened by repeated thermal cycles and potentially some moisture ingress over winter, was starting to degrade and crumble in the most exposed areas.
- Poor Seal Around Flue: A gap had developed between the flue collar and the oven dome insulation, allowing significant heat to escape via convection.
The Repair Process
John decided to tackle the repairs himself, armed with research and the right materials.
- Repairing Cracks: He carefully chipped away the loose, crumbling material around the larger cracks. He then used a high-temperature refractory cement to fill these voids, ensuring it was packed firmly against the remaining insulation blanket. For smaller cracks, he used a flexible, heat-resistant sealant.
- Sealing the Flue: He removed the flue collar temporarily. He then packed a high-temperature ceramic fiber blanket tightly into the gap between the dome and the collar, ensuring a complete seal. He then reattached the flue collar.
- External Finishing: Once the cement repairs had set slightly, he applied a new coat of breathable, heat-resistant stucco over the affected areas, feathering it into the existing finish to create a seamless look.
- Curing: Crucially, John knew he needed to re-cure the repaired areas. He followed a modified curing schedule:
- Day 1: A small fire for 2 hours.
- Day 2: A medium fire for 3 hours, bringing the dome to around 500°F (260°C).
- Day 3: A larger fire for 4 hours, aiming for 700°F (370°C).
The Outcome
After the repairs and curing process, John fired up his oven. The difference was remarkable. The oven heated up significantly faster, reaching its target temperature of 900°F (480°C) in just under an hour. The heat was more consistent, even with a slight breeze, and the pizzas cooked perfectly in about 90 seconds. John’s insulation condition review and subsequent repairs had successfully revitalized his beloved pizza oven.
Insulation Performance Comparison: Key Metrics
To further illustrate the impact of insulation, consider a hypothetical comparison of two identical pizza ovens, differing only in their insulation quality.
| Feature | Oven A: Standard Insulation (e.g., 2″ basic ceramic fiber) | Oven B: High-Performance Insulation (e.g., 4″ premium ceramic fiber + board) | Impact on Performance |
|---|---|---|---|
| **Heat-Up Time** | 90 minutes to 750°F (400°C) | 60 minutes to 750°F (400°C) | Faster heat-up means quicker cooking readiness and less fuel consumption initially. |
| **Temperature Retention** | Drops 100°F (55°C) in 30 minutes after fire dies down | Drops 50°F (28°C) in 30 minutes after fire dies down | Better retention means longer cooking windows, ability to cook multiple pizzas. |
| **Fuel Efficiency** | Requires 30% more wood per cooking session | Requires less wood to maintain target temperature | Lower fuel costs and less effort in managing the fire. |
| **Surface Temperature** | Exterior dome reaches 200°F (93°C) | Exterior dome reaches 150°F (65°C) | Safer exterior surface, reduced risk of burns, less heat radiating away from oven. |
| **Durability** | Moderate; susceptible to cracking over time | High; more resistant to thermal shock and degradation | Longer lifespan, fewer repair needs. |
*Note: These figures are illustrative and actual performance will vary based on specific materials, oven design, and environmental conditions.*
Frequently Asked Questions
What Is The Most Common Cause Of Pizza Oven Insulation Failure?
The most common causes are moisture ingress followed by rapid heating (leading to steam expansion and cracking/spalling) and repeated thermal cycling, which can cause materials to degrade, crack, or lose density over time. Physical impact and poor installation (e.g., insufficient layers, gaps) are also significant factors.
How Often Should I Inspect My Pizza Oven Insulation?
A quick visual inspection should be done before and after each use, looking for obvious signs of damage. A more thorough inspection, including checking for gaps and material integrity, is recommended at least once a year, preferably before the main cooking season or after a period of heavy use.
Can I Repair Damaged Pizza Oven Insulation Myself?
Yes, minor to moderate repairs can often be done by a DIY enthusiast. This typically involves using refractory mortar, high-temperature sealants, or specialized repair compounds. For extensive damage affecting the structural integrity of the dome, professional help may be advisable. Always ensure proper safety precautions (PPE) and follow up with a thorough curing process.
What Are The Signs That My Pizza Oven Insulation Is Failing?
Key signs include:
- Longer heat-up times.
- Difficulty maintaining high temperatures.
- Visible cracks or crumbling on the oven exterior or interior.
- Uneven cooking or hot/cold spots.
- Excessive heat radiating from the oven exterior.
- Spalling (surface flaking) of the dome or hearth.
How Does Weather Affect Pizza Oven Insulation?
Weather, particularly moisture (rain, snow) and freeze-thaw cycles, is a major enemy of pizza oven insulation. Water absorbed by the

As the author of the “Ultimate Pizza Guide: Recipes, Tips & Secrets Revealed,” I’m dedicated to sharing my love for pizza and empowering others to create delicious homemade pizzas with ease. Join me on a journey to uncover the secrets to perfecting your pizza game!