To prevent bubbles in pizza dough, ensure the dough is evenly rolled and any air pockets are pressed out. Proper fermentation and degassing during kneading also help minimize bubbles.
Perfecting pizza dough is an art that every home chef and seasoned pizzaiolo strives to master. Bubbles in pizza dough can disrupt the ultimate pie experience, leaving uneven crusts and inconsistent texture. Pizza enthusiasts everywhere know the importance of a smooth, bubble-free base.
The secret lies in mastering dough handling, from mixing to the final stretch before baking. Adequate kneading, timely fermentation, and mindful rolling are paramount steps in achieving that ideal, bubble-free dough that serves as the canvas for your flavorful toppings. Whether you’re a passionate home cook or a professional chef, paying close attention to dough preparation techniques can elevate your pizza-making game, creating the perfect foundation for a delectable, crispy crust.
The Art Of Pizza: Crust Without Bubbles
Pizza crust perfection is a craft—smooth, even, and delightfully crisp. Expert bakers know bubbles in pizza dough can disrupt this. Let’s reveal how to achieve a flawless pizza base free of unwanted air pockets.
The Science Behind Pizza Dough Bubbles
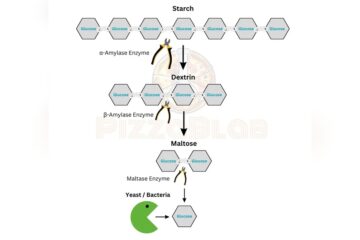
Yeast is the culprit behind dough bubbles. It eats sugar, exhales CO2, and makes dough rise. Proper fermentation is a balancing act; it needs enough time but not too much.
- Mix ingredients until they form a smooth dough.
- Let the dough rest and rise—the first proof.
- Temperature influences yeast activity and bubble size.
Kneading the dough evenly distributes yeast. A second rise, or proofing, allows flavors to develop further.
Why Bubbles Can Ruin Your Perfect Pizza
Bubbles may seem harmless, but they can compromise pizza quality. Large, uneven bubbles create an inconsistent crust—burnt on top and undercooked on the bottom. Precise rolling and handling can prevent this.
| Bubble Effect | Result on Pizza |
| Large bubbles | Uneven baking and texture |
| Small, controlled bubbles | Uniform thickness and crispiness |
Too much yeast or sugar often leads to bubble trouble. Dough stretching should be gentle to maintain an even surface. A few strategies include:
- Proper weighing of ingredients for balance.
- Docking the dough with a fork before baking to release trapped air.
- Cooling dough before shaping to relax gluten.
Ingredients Matter: Choosing The Right Flour And Yeast
Perfect pizza dough starts with the right mix of ingredients. The type of flour and yeast used can make a noticeable difference in preventing those pesky dough bubbles. Let’s dive into the details of choosing the best flour and yeast for that ideal pizza base.
Flour Types And Gluten Content
Different flours can affect your pizza dough’s texture. Bread, all-purpose, and 00 flours are common choices:
- Bread flour: High gluten content equals a chewy crust.
- All-purpose flour: A versatile option with moderate gluten.
- 00 flour: Finely milled, it’s great for a tender crust.
Gluten strength impacts how the dough handles gases during fermentation. Stronger gluten can help trap gases, reducing bubbles.
Active Dry Vs. Instant Yeast: Which Is Best?
Yeast type influences how the dough rises. Let’s compare Active Dry and Instant Yeast:
| Yeast Type | Activation | Rise Time |
| Active Dry | Needs to dissolve in water first | Longer rise, more flavor development |
| Instant Yeast | No pre-dissolving required | Faster rise saves time |
Choose Instant Yeast for quicker results with less worry about bubbles. Active Dry Yeast is better for a slow ferment and deeper flavor.
Kneading Techniques To Prevent Unwanted Bubbles
Perfect pizza dough is an art form. Achieving that chewy yet crisp crust can be elusive. A common issue for budding pizzaiolos is unwanted bubbles. These can cause uneven texture and doneness. The trick lies in proper kneading techniques.
Hand Kneading Vs. Machine: Pros And Cons
Hand kneading and machine kneading are two paths to that perfect dough. Each has its merits.
| Hand Kneading | Machine Kneading | |
| Control | Allows for more tactile feedback and adjustment. | Precise, consistent action but less feel. |
| Effort | Requires more physical work and time. | Hands-free and fast. |
| Texture | It may create a more unique, artisan texture. | Can homogenize dough for uniformity. |
| Bubbles | Better at identifying and removing air pockets. | It may incorporate more air if not used properly. |
Kneading Time: How Much Is Just Right?
Kneading time greatly influences dough quality. Too little, and the gluten won’t develop properly, and too much, and the dough will become tough.
- Hand Kneading: Aim for 10-15 minutes for optimal gluten formation.
- Machine Kneading: Generally, 5-10 minutes suffice, depending on the machine’s power.
Balance is key. It’s crucial to monitor the dough’s texture. When done correctly, it should feel smooth and elastic.
The Role Of Dough Temperature In Bubble Formation
Bubble formation in pizza dough is a common challenge for both home cooks and professional chefs. The presence of large, uneven bubbles can interfere with the texture and appearance of your pizza crust. Understanding the influence of dough temperature on bubble formation is crucial. It helps manage the fermentation process and achieve a perfectly uniform crust.
Optimal Temperature For Dough Rising
The temperature at which dough rises significantly impacts yeast activity and gas production. Yeast becomes more active in warmer conditions, leading to faster fermentation and more gas bubbles. This can cause the dough to have large, irregular bubbles. On the contrary, a cooler temperature slows down yeast activity, promoting a slow, even rise and smaller, uniform bubbles.
For the ideal rise, maintain the dough temperature between 75 and 78 degrees Fahrenheit (24 and 26 degrees Celsius). This range strikes a balance that allows the yeast to work efficiently without creating too many bubbles.
Tips For Controlling Dough Temperature
- Measure Ingredients Temperature: Before mixing, use a thermometer to ensure your water and flour are within the optimal temperature range.
- Adjust Water Temperature: Warm up or cool down the water used to mix the dough to control the overall dough temperature.
- Monitor Room Temperature: Keep the room where the dough rises consistent, away from drafts or direct heat sources.
- Use Dough Containers: Insulated containers or a simple towel over the dough can maintain a stable temperature during rising.
- Fridge for Slow Rise: For a gradual rise and flavor development, let the dough sit in the refrigerator.
By mastering these techniques, you can prevent unwanted bubbles in your pizza dough, leading to a superior and delicious homemade pizza.
Proofing Perfection: Managing The Rise Of Pizza Dough
Making pizza dough seems simple, but it hides a secret: the art of proofing. Proper rising leads to the perfect crust, while errors can cause unwanted bubbles. In this post, we’ll unlock the steps to a smooth, bubble-free pizza base. Follow along as we explore the magic behind the perfect pizza dough rise.
The First Rise: Creating A Smooth Dough
Initiating the proofing process, the first rise is essential for developing flavor and texture. Here’s how to achieve a smooth dough:
- Mix ingredients until they form a uniform mixture.
- Allow the dough to rest in a warm, draft-free environment.
- Cover the bowl with plastic wrap or a damp cloth to avoid drying out.
- Watch the dough double in size, a sign that the yeast is working properly.
By controlling temperature and time, the dough rises evenly, leading to a smooth, elastic texture.
The Second Rise: When To Stop For Bubble-free Crust
The second rise refines the texture, but knowing when to stop is crucial:
- Punch down the dough after the first rise to remove air bubbles.
- Shape your pizza and let it rise for 20-30 minutes.
- Look for a slight puffiness, an indicator to stop the rise.
| Timing | Temperature | Dough Appearance |
| 20-30 minutes | Room Temperature | Slight puffiness, no large bubbles |
Attentiveness during this phase ensures a crust with minimal bubbles. The second rise gives your pizza dough the final shape and character.
Rolling Out Dough: Techniques For An Even Base
A smooth and even dough base is key to making pizza. Proper dough rolling techniques help create a perfect canvas for your toppings. Let’s explore how to roll out dough for that flawless pizza base every time.
Rolling Vs. Stretching: What’s Better For Bubble Prevention?
Dough rolling and stretching each have their own merits. Rolling with a pin can compress air bubbles, leading to a denser crust. On the other hand, stretching by hand allows controlled shaping. It also preserves air bubbles for a light and airy crust. For bubble prevention, a gentle combination of both might be the answer. Use a rolling pin to start, then finish with hand stretching to fine-tune the shape without pushing out too much air.
The Impact Of Dough Thickness On Bubble Formation
Thickness plays a big role in bubble formation. A thick dough can trap more air and result in bubbles. Thin doughs are less prone to this. Aim for an even thickness as you roll out your dough. Use your fingertips or a rolling pin to tap down high spots. A uniform base cooks evenly, reducing bubble trouble. Here are steps to achieve it:
- Begin rolling from the center, pushing outward.
- Rotate the dough frequently for an even shape.
- Apply even pressure to keep the thickness consistent.
Remember, it’s too thin, and your dough might tear. Too thick, and you might discover unwanted doughy pockets. Strive for that perfect medium.
Toppings And Sauce: Apply Without Adding Air
Mastering the perfect pizza at home calls for attention to detail, especially when it comes to toppings and sauce. Adding them without trapping air prevents those unwanted bubbles that can ruin the texture of your pizza dough. Let’s uncover the best ways to apply toppings and sauce for a flawless finish.
Layering Your Toppings For Even Cooking
To ensure your pizza cooks evenly, it is crucial to layer toppings properly. Start with the lighter ingredients and finish with the heavier ones.
- Begin with leafy greens like spinach or arugula.
- Add thin slices of tomatoes or mushrooms.
- Top with cheese, spreading it evenly to the edges.
- Finish with meat or heavier toppings last.
This method keeps the distribution uniform and avoids air pockets.
Applying Sauce: Strategies To Avoid Trapping Air
The sauce is all about the application technique.
- Spoon the sauce into the center of your base.
- Use the back of the spoon to spread outwards in a spiral.
- Keep the layer thin and consistent, avoiding the very edge of the dough.
This approach encourages an air-free environment beneath the sauce.
Final Steps: Baking Practices To Reduce Bubbles
Perfect pizza requires attention to detail, especially when it comes to baking.
Bubbles can turn a good crust into a disappointing experience.
Applying specific techniques when baking can ensure a bubble-free pizza crust.
Oven Temperature And Pizza Stone Usage
Consistent heat is vital for even cooking.
Set your oven to the right temperature before baking.
Preheat for at least 30 minutes.
- High temperatures create quick rise and crust formation.
- Using a pizza stone helps bake evenly and absorbs moisture.
- Always preheat the pizza stone with the oven.
Piercing Techniques To Release Air During Baking
Piercing the dough before baking can help release trapped air.
Use a fork to create small holes in the dough.
This technique is called docking.
Do not pierce too deeply.
You want to avoid compromising the dough’s structure.
| Tool | Method |
| Docker or Fork | Gently press down, creating uniform holes. |
| Hands | Press on the surface to spread the dough and squeeze out air pockets. |
Common Mistakes And How To Avoid Them
In pursuit of the perfect pizza, avoiding bubbles in the dough is essential. Let’s explore common pitfalls and how they can be sidestepped.
Over proofing: The Bubble Culprit
Let dough rise too long, and bubbles become your foe. Overproofing lets dough generate excess gas. This gas stretches the gluten, creating large pockets. Here’s what you can do:
- Keep an eye on the proofing time.
- When the dough doubles in size, it’s time to bake.
- Conduct the finger dent test: poke the dough lightly. If it springs back slowly, it’s ready.
- Monitor room temperature. Warmer rooms speed up the proofing process.
Dealing With Humidity And Its Effects On Dough
Humidity can interfere with dough-making. Moisture in the air gets into the flour, affecting texture.
Here’s how you can tackle dough in damp conditions:
- Use a dehumidifier in the kitchen if possible.
- Adjust flour or water amounts based on the humidity. Stickier than usual? Add a bit more flour.
- Store flour in an airtight container to keep its condition stable.
Troubleshooting: Solutions For Bubble Challenges
Tackling bubbles in pizza dough requires smart fixes and recipe adjustments. Whether dealing with stubborn dough at high altitudes or last-minute bubble pops, find the right solution to ensure perfect pizza every time.
Adjusting Recipes For High-Altitude Baking
Baking at high altitudes can be tricky. Air pressure affects dough rise and texture. With a few tweaks, you can prevent unwanted bubbles.
- Decrease yeast to slow fermentation.
- Reduce sugar to avoid over-rising.
- Increase liquid to combat dryness.
- Lower baking temperature to ensure even cooking.
Test and adjust your dough for the best results. Patience yields the perfect crust.
Quick Fixes For Bubble Pops Before Serving
Pre-serving bubbles can deflate your pizza presentation. Quick fixes can salvage the situation.
- Prick bubbles with a fork to let out steam.
- Gently flatten the dough to spread air evenly.
- Brush the crust with oil to enhance the golden texture.
Use these hacks to prevent and address last-minute dough dilemmas. Serve your pizza with confidence!

Frequently Asked Questions
Why Do I Get Air Bubbles In My Pizza Dough?
Air bubbles in pizza dough result from yeast fermentation. Quick rising times or high yeast amounts can cause excess gas production, leading to bubbles. Proper kneading reduces this issue by distributing yeast uniformly and developing gluten, which helps trap gas more effectively.
How To Remove Air Bubbles From Dough?
To remove air bubbles from the dough, start by kneading it thoroughly. Press and stretch the dough, expelling air pockets. Roll it tightly to push out trapped air. Rest the dough briefly, then repeat the process if necessary. This technique results in a smoother dough.
How Do You Get The Air Out Of Pizza Dough?
To remove air from the pizza dough, gently punch the dough down after the first rise. Then, knead it for a few seconds to release any trapped air bubbles before shaping it into your pizza base.
How To Stop Pizza Dough From Puffing Up?
To stop pizza dough from puffing up, dock it by pricking it with a fork before baking. Use a preheated oven, and avoid excessive yeast or high-gluten flour. Ensure even thickness when rolling out your dough to promote uniform cooking.
Conclusion
With our tips, achieving the perfect pizza dough without bubbles is simple. Embrace the art of patience and precision when preparing your dough. Remember, the right techniques ensure a consistent, bubble-free base every time. Happy baking, and enjoy that flawless pizza experience at home!

As the author of the “Ultimate Pizza Guide: Recipes, Tips & Secrets Revealed,” I’m dedicated to sharing my love for pizza and empowering others to create delicious homemade pizzas with ease. Join me on a journey to uncover the secrets to perfecting your pizza game!