How long should you knead pizza dough? Pizza dough should typically be kneaded for about 5 to 10 minutes. Ensure the dough is smooth and elastic before stopping.
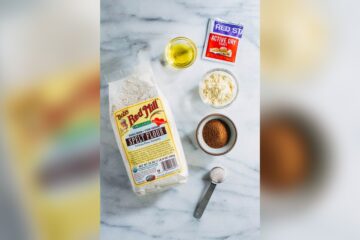
Crafting the perfect pizza dough is an essential step in achieving that delightful combination of crispy crust and chewy bite everyone loves. Kneading plays a crucial role in gluten development, which gives the dough its structure and texture. Whether you’re a home cook or a professional chef, mastering the art of kneading can elevate your pizza-making game.
Understanding the right texture and knowing when the dough has been kneaded enough will lead to consistent, delicious results every time. Remember, the time spent kneading can vary depending on the method used, so it’s helpful to also rely on the dough’s look and feel.
Introduction To Kneading Pizza Dough
The journey to a perfect pizza begins with the art of kneading the dough. This step is not just about mixing ingredients. It’s a technique that transforms flour, water, yeast, and salt into the airy, sumptuous base we love to top and eat. The kneading process also determines the dough’s texture and final quality. So, let’s dive into understanding kneading and its importance in pizza making.
The Role Of Kneading In Pizza Making
Kneading dough does more than mix ingredients. It develops gluten, a protein crucial for dough structure. Proper kneading gives dough strength and elasticity, creating a light, chewy crust. Let’s explore how proper kneading affects pizza quality:
- Gluten formation: Kneading lines up gluten proteins to form a strong network.
- Air incorporation: As you knead, the air gets trapped, helping the dough rise later.
- Texture and flavor: Through kneading, the dough gains the right texture and enhances flavor after baking.
Ingredients And Their Impact On Kneading Time
Different ingredients can alter kneading time. Here’s how various components play a role:
| Ingredient | Impact on Kneading Time |
| Flour type | Higher protein flours need more kneading. |
| Hydration level | Wetter doughs may require a longer kneading. |
| Yeast | Fresh yeast blends quicker than dry, affecting time. |
| Salt and sugar | These can toughen dough, sometimes requiring extra kneading. |
| Fats | Fats like oil can reduce kneading time. |
Remember, while the type of ingredients matters, so does the proportion used. Balancing these factors is key to perfecting your pizza dough’s kneading time.
Key Signs Of Properly Kneaded Dough
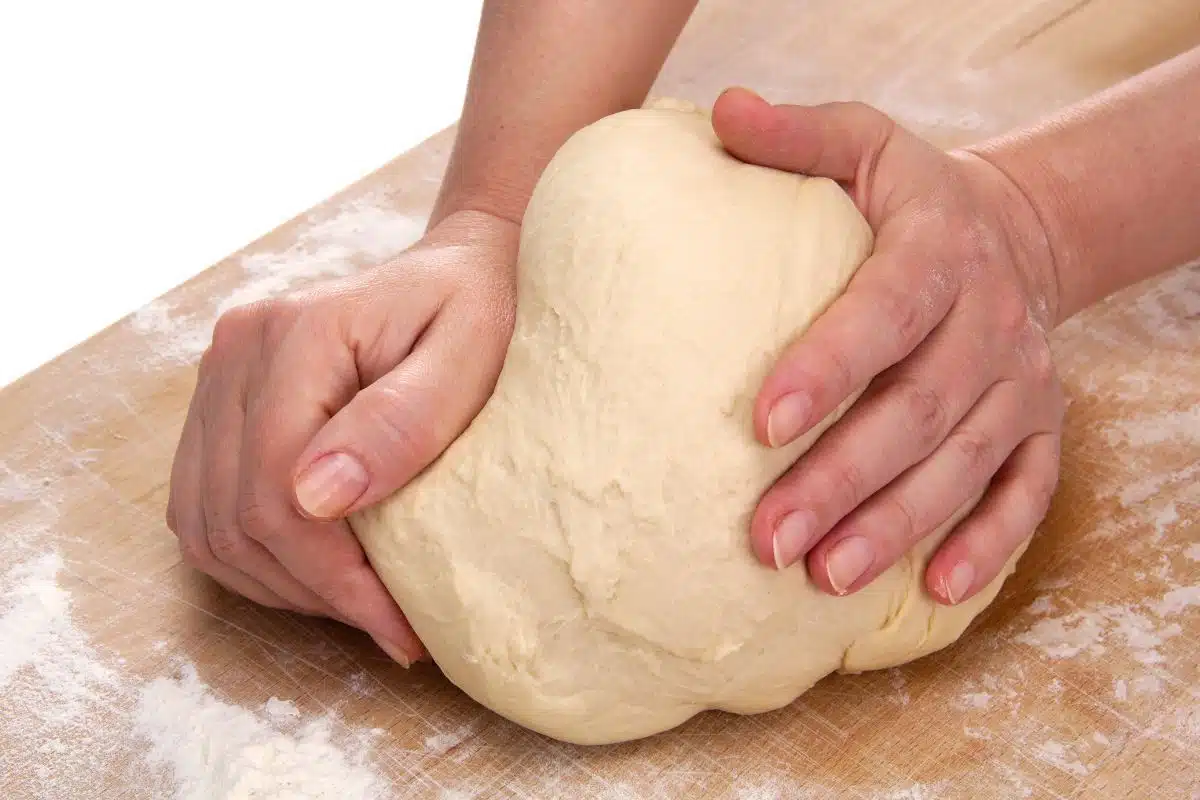
The journey to the perfect pizza begins with kneading the dough. It’s not just about the time spent; recognizing when the dough has been kneaded enough is crucial. There are clear signs that indicate the dough is ready for the next step. Aim for dough that’s smooth, soft, and springy to the touch. Proper kneading is what develops the gluten, giving the dough elasticity and strength.
Elasticity And Gluten Development
Elasticity is a tell-tale sign of well-kneaded dough. Here’s what to look for:
- The dough should spring back when poked.
- It should not tear easily when stretched.
- The surface should be smooth and even.
As gluten develops, it forms a network that traps air and gives structure. This is what makes your pizza chewy and crisp. Knead until these qualities are evident.
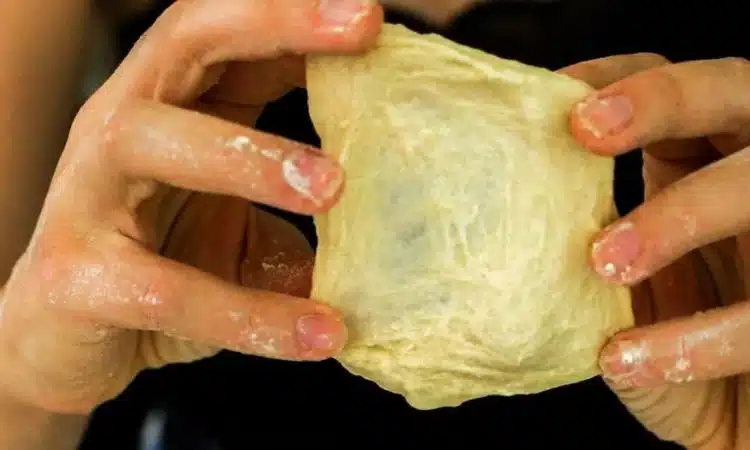
The Windowpane Test: A Practical Demonstration
Performing the windowpane test can show if the dough is kneaded well:
- Flatten a small piece of dough with your hands.
- Gently stretch it out from the center.
- Hold it up to the light.
If you can stretch it thin without tearing, forming a see-through ‘windowpane,’ the gluten is well-developed. The dough is now ready for its next phase of transformation: Rising to perfection.
Kneading Techniques To Master
Kneading pizza dough is both an art and a science. The right technique ensures the perfect texture and flavor. Here are key methods and tips to help you master the art of kneading.
Hand-kneading Vs. Mixer: Pros And Cons
Choosing between hand-kneading and using a mixer is a big decision. Both methods affect the outcome of your pizza dough.
| Method | Pros | Cons |
| Hand-Kneading | No special equipment is needed Fine-tunes dough by feel Gives full control over the process | May be time-consuming Requires more physical effort |
| Using a Mixer | Saves time Reduces manual labor | More clean-up involved Could over-knead if not careful |
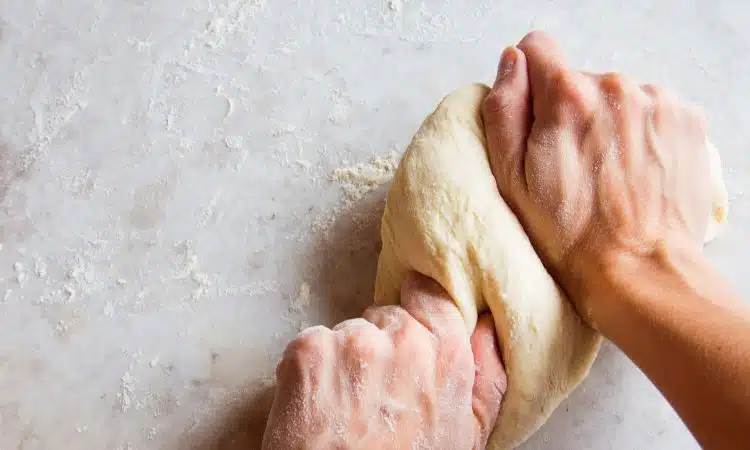
Tips For Efficient Dough Stretching And Folding
Folding and stretching the dough develops gluten, which gives your pizza that desirable chewy texture.
- Begin with a floured surface to prevent sticking.
- Press the dough down into a flat disk using your fingers.
- Stretch the dough by pushing it outward from the center.
- Rotate frequently for an even shape.
- Use the folding technique by bringing edges toward the middle.
- Let the dough rest if it becomes too springy.

Determining Kneading Duration
Perfect pizza begins with the perfect dough and the secret lies in the kneading. Determining the kneading duration is crucial. It affects the dough’s texture and flavor.
Common Timelines For Different Types Of Dough
Different pizza doughs need different kneading times. While no size fits all, general guidelines help.
- Thin Crust: Quick kneading, about 5-7 minutes.
- Classic Hand-Tossed: Moderate kneading, 7-10 minutes.
- Chicago-style Deep Dish: Extended kneading, 10-15 minutes.
Times can vary based on factors like flour type and mixer efficiency.
Adjusting Kneading Time Based On Dough Feel
Kneading times are not set in stone. You must adjust based on the dough’s feel. Here’s how:
- Initial Texture: Begin by checking the roughness or smoothness.
- Elasticity: Stretch a piece; it should be pliable and not tear easily.
- Stickiness: It should not stick to your hands excessively. A slight tack is okay.
Adjust the kneading time until these qualities are present in your dough. Trust your touch!
The Science Behind Dough Elasticity
When you bite into that perfect slice of pizza, have you ever wondered what makes the crust so delightfully chewy? It’s all about the science of dough elasticity! Understanding the kneading process is crucial for that ideal pizza base. Let’s dive into the reasons why kneading pizza dough is both an art and a science.
The Role Of Yeast And Fermentation In Kneading
Yeast acts as the backbone of pizza dough elasticity. During kneading, yeast helps the dough to rise and become fluffy. Kneading evenly distributes the yeast through the dough, ensuring that every inch puffs up nicely.
- Release of Carbon Dioxide: While fermenting, yeast produces gas, which forms bubbles in the dough.
- Development of Gluten: Kneading forms strong gluten networks, which trap the gas bubbles.
- Improved Texture: Proper fermentation results in a dough that is both stretchy and aerated.
It’s like a balloon party in your dough, with yeast inflating tiny balloons that make your crust light and airy.
Temperature And Humidity: External Factors That Matter
The environment plays a massive role in the kneading process. Just like you adapt to different weathers, your pizza dough does too! Temperature and humidity impact how well your dough rises and becomes elastic.
Warm Temperatures: Heat speeds up yeast activity, leading to a faster rise. Too hot, though, and the yeast will overwork and deflate!
Humidity: Moisture in the air can make your dough sticky or too dry. Balance is key to the perfect texture.
| Condition | Yeast Activity | Dough Texture |
| Warm and Humid | Speeds Up | Sticky Dough |
| Cool and Dry | Slows Down | Dry Dough |
Pay close attention to temperature and humidity to achieve the perfect balance. Your dough will thank you for its excellent elasticity and texture!
Troubleshooting Common Kneading Issues
Perfecting pizza dough is both an art and a science. Kneading is key to the final texture. Sometimes, though, the dough will only cooperate. It either needs to be more tough or more slack. Don’t worry! Here are easy fixes for common problems. Let’s troubleshoot together!
Over-kneading: Causes And Solutions
Signs of an over-kneaded dough might include a tight, dense texture or a dough that snaps back when stretched. Overkneading happens when the gluten strands become too tight, and it often occurs with powerful mixers.
- Solution 1: Let the dough rest. This relaxes gluten, making the dough soft again.
- Solution 2: Divide the dough. Work with smaller portions for ease.
- Solution 3: If the dough becomes too stiff, warm it slightly. Gentle warmth relaxes gluten.
Under-kneaded Dough: How To Recover
An under-kneaded dough is typically flat and lacks structure. The dough may tear easily. The gluten needs to develop more strength.
- Step 1: Continue kneading. Additional work can often turn it around.
- Step 2: Perform the windowpane test. Stretch a piece thinly. It should become semi-transparent without tearing.
- Step 3: Let the dough rise. Proper fermenting helps gluten development.
| Issue | Symptoms | Recovery Actions |
| Over-kneading | Tight, dense, snaps back | Rest, divide, warm-up |
| Under-kneaded | Flat, tears easily | Knead more, windowpane test, rise time |
Remember: Kneading isn’t just a step; it’s your dough’s first journey toward delicious pizza! Practice pays off.
Rest And Rise: Post-kneading Steps
Kneading pizza dough is an art, typically requiring about 10 to 15 minutes to achieve the perfect elasticity. After reaching the desired texture, it’s crucial to let the dough rest and rise for optimal flavor and structure development.
Optimal Resting Times For Pizza Dough
Kneading pizza dough is just the start. The ‘Rest and Rise’ process is crucial too. After kneading comes resting. The dough needs time to rise and develop flavors. So, how long?
Quick doughs might only need 30 minutes to rest, but traditional recipes often call for a longer rise, which can take 1 to 24 hours. Plan your pizza-making accordingly! Using a fridge? Let it rise slowly for up to 72 hours. This slow rise gives the crust a great texture and taste.
- 30 minutes – For a quick pizza dough.
- 1-4 hours – For a standard rise at room temperature.
- 24-72 hours – In the refrigerator for depth of flavor.
Creating The Ideal Environment For Dough Proofing
Your dough needs the perfect spot to rise. Warmth and humidity are key. Optimal proofing happens at 75-85°F (24-29°C) with high humidity.
No warm spot? No problem. Use your oven. Please turn it on to the lowest setting for a few minutes, then switch it off. Place the dough inside with a bowl of hot water. The result? A cozy, moist environment for your dough to rise beautifully.
- Set the bowl, covered with a damp cloth, in a warm spot.
- Keep the temperature consistent for even rising.
- Use your oven with hot water to create humidity if needed.
Perfecting Texture Through Practice
When crafting the perfect pizza dough, texture is king. Achieving that ideal balance between elasticity and firmness often boils down to one crucial process: kneading. But how do you master the kneading technique? It takes patience, practice, and a little bit of wisdom from those who’ve done it thousands of times. Let’s dive into the art of kneading and how daily practice can improve your dough-handling skills.
Insights From Professional Chefs
Professionals understand that the feel of the dough is more important than the clock. The chef’s hands become finely tuned instruments, discerning when the gluten has been worked just enough to create that supple and stretchy texture. Through years of experience, they have pinpointed that sweet spot where dough transforms from a shaggy mass into a smooth, elastic ball.
- Listen to the dough: It should feel tacky but not sticky.
- Observe its stretch: Properly kneaded dough should stretch without tearing.
- Windowpane test: A small piece of dough should stretch thin enough to let light pass without breaking.
Daily Practice Routines For Improved Consistency
Developing a consistently perfect dough requires daily practice. Like any skill, the more you do it, the better you get. Here’s how you can form a routine that hones your kneading skills:
| Day | Practice Task | Focus Point |
| Monday | Basic Knead | Time yourself |
| Tuesday | Stretch and Fold | Gluten development |
| Wednesday | Windowpane Test | Texture checking |
| Thursday | Rest and Rise | Observe yeast activity |
| Friday | Finger Poke Test | Proofing observation |
| Saturday / Sunday | Combine Techniques | Apply all learned |
By incorporating these varied tasks into your kneading routine, you will learn your dough’s behavior and understand its reactions to different handling methods. Practice makes the master, and soon, the perfect pizza dough will become second nature to you.
Conclusion: The Art Of Pizza Dough
Mastering pizza dough is like painting a masterpiece. It requires patience, skill, and a touch of love. The perfect dough can elevate a simple pizza to a culinary delight. Let’s wrap up the crucial points and encourage a journey of dough discovery.
Summarizing The Key Takeaways
- Kneading time: typically 8-10 minutes by hand.
- Texture: the dough should be smooth and elastic.
- Windowpane test: a reliable method to check gluten development.
- Practice is more important than sticking to the clock.
- Results vary based on flour type, hydration, and yeast.
Encouraging Home Bakers To Experiment
Baking is a journey filled with trials and triumphs. Don’t fear mistakes, as each one is a stepping stone to the perfect pizza. Trust your senses – touch, sight, and smell – to guide you. Here are some quick tips to get started:
- Change one variable at a time to see its effect.
- Record your results to track progress.
- Share your creations with friends and family.
Embrace the art of pizza dough. Let your kitchen be your studio, and your hands, the brushes. The canvas awaits!
Frequently Asked Questions
How To Know If Pizza Dough Is Kneaded Enough?
Check your pizza dough for a smooth texture and springiness. Perform a windowpane test by stretching a small piece until it’s thin and translucent without tearing. If it passes this test, you’ve kneaded it enough.
Can You Over Knead Pizza?
Yes, you can over-knead pizza dough. Over-kneading can result in tough, chewy crusts due to excess gluten development. Aim for a smooth, elastic dough consistency to avoid this issue.
How Long Do You Knead The Dough For Pizza?
Knead pizza dough for about 7-10 minutes until it’s smooth and elastic. This develops the gluten for a good texture.
Is 3 Hours Enough For Pizza Dough?
Three hours is generally sufficient for pizza dough to rise, creating a satisfactory base for most recipes.
Conclusion
Mastering the art of kneading pizza dough takes practice, but it’s essential for a perfect crust. Aim for about 7-10 minutes by hand or 5-7 minutes with a mixer. Trust your touch; dough should be elastic and slightly tacky. Remember, patience in kneading brings out the best in your pizza.
Happy baking!

As the author of the “Ultimate Pizza Guide: Recipes, Tips & Secrets Revealed,” I’m dedicated to sharing my love for pizza and empowering others to create delicious homemade pizzas with ease. Join me on a journey to uncover the secrets to perfecting your pizza game!