To make a pizza peel at home, choose a durable wood like maple and cut it to size. Sand, shape, and finish with food-safe mineral oil for a smooth, sturdy surface.
Crafting a pizza peel at home isn’t just a practical venture for pizza enthusiasts; it’s an engaging DIY woodworking project that includes designing, shaping, and finishing a piece of wood that will transform into a functional kitchen tool. This hands-on activity allows you to customize your pizza peel according to your oven size and preference, creating an authentic pizzeria experience in your kitchen.
With essential tools, patience, and attention to detail, anyone can make a pizza peel that rivals those used in professional settings. Ensuring your homemade peel is smooth and well-crafted makes sliding pizzas in and out of the oven a breeze and adds a touch of artisan craftsmanship to your kitchen arsenal.
Choosing The Right Materials
Making a pizza peel at home starts with selecting the suitable materials. A high-quality pizza peel requires durable and safe materials. Let’s explore what you need to know about wood, alternatives, and tools for your project.
Selecting Quality Wood
Choosing the correct wood is crucial for your pizza peel’s longevity and performance. You want a wood that resists warping and moisture. Hardwoods like maple, cherry, and walnut are top choices for durability and food safety. Keep these essential points in mind:
- Hard Maple: Ideal for its fine grain and scratch resistance.
- Cherry: Adds a warm color and is strong.
- Walnut: Offers a richer hue with reliable sturdiness.
Substitutes For Traditional Wood
Can’t find the ideal hardwood or want something different? Several substitutes offer practical benefits:
| Material | Benefits |
| Bamboo | Eco-friendly and naturally antimicrobial |
| Composite Woods | It provides uniformity and can be cost-effective |
| Plywood | Accessible and can be sturdy if high-quality |
Tools Required For The Project
Having the necessary tools on hand will make all the difference. Prepare these tools before you start:
- Saw: To cut the wood to size
- Sander or Sandpaper: For smoothing the wood
- Wood glue: To join pieces if needed
- Clamps: To hold the wood together while gluing
- Food-safe finish: To protect your peel
- Measuring tape and Pencil: For marking cuts accurately

Designing Your Pizza Peel
Crafting a pizza peel at home is a delightful project for any woodworking enthusiast or pizza lover. A custom-designed pizza peel adds a personal touch to your kitchen and enhances your pizza-making experience. Designing your pizza peel involves thinking about size, shape, and ergonomics. Let’s dive into the specifics and transform a simple piece of wood into your pizza-handling masterpiece.
Determining Dimensions
The size of your pizza peel should match the pizzas you plan to make. To begin, consider the size of your oven and how much space you have for storage. Standard dimensions for homemade peels range between 12 to 14 inches wide and 14 to 16 inches long for the blade. This ensures enough room to handle a typical family-sized pizza with ease.
Selecting The Perfect Shape
The shape of your pizza peel is both an aesthetic and practical decision. The two prevalent styles are the classic round and the modern rectangular shape. A round peel is ideal for spinning pizzas during cooking, while a rectangular peel offers a larger surface area for transferring pizzas. Sketch out a few designs and choose one that visually and functionally appeals to you.
The Importance Of A Long Handle
A long handle keeps your hands away from the heat and provides leverage to maneuver your pizza expertly. Handles generally measure between 8 to 12 inches, depending on your reach and the depth of your oven. A sturdy grip is also crucial. Ensure the handle is thick enough to hold comfortably, and consider adding a hole at the end for easy hanging storage.
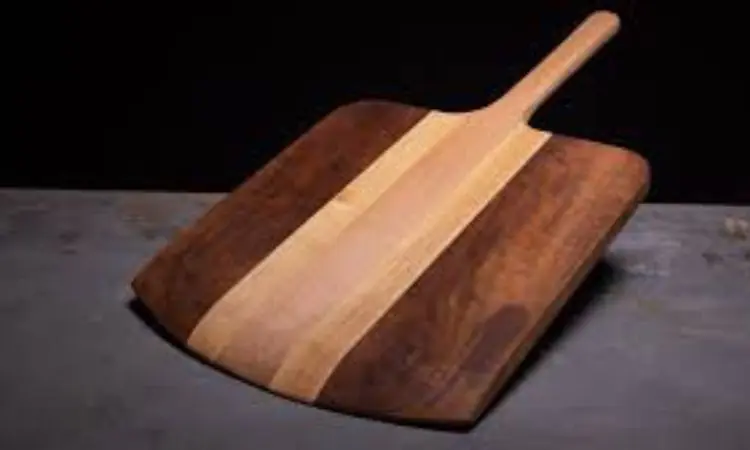
Crafting The Peel
Making a pizza peel at home is a delightful project for any DIY enthusiast. This essential tool helps easily slide pizzas in and out of the oven. Below, we’ll explore the process of crafting a durable and functional pizza peel from wood.
Cutting And Shaping The Wood
Please choose a suitable wood, such as maple, for its moisture resistance and durability. Trace the peel shape onto the wood. Use a jigsaw or bandsaw for cutting. Create a tapered edge on the front of the peel to make it easy to slide under pizzas.
Smoothing Edges And Surfaces
Begin by sanding down all edges and surfaces to prevent splinters. Fine-grit sandpaper works best for a smooth finish. Pay extra attention to the tapered edge; it must be soft and thin for functionality.
Assembling The Handle
Cut a separate piece of wood for the handle or leave a portion of the wood uncut for this purpose. Attach the handle securely to the base with wood glue and screws. Ensure a comfortable grip by sanding the handle well.
With these steps, your homemade pizza peel takes shape. Personalize it with oil or a wood finish for protection. With this custom creation, your pizzas will slide in and out of the oven effortlessly!
Finishing Touches
The journey to create a homemade pizza peel is almost complete. But the devil is in the details. Perfecting the finishing touches can transform a good pizza peel into a great one. Carefully sand, finish, and, if desired, add perforations. This helps ensure your peel isn’t just functional but also durable and a work of art.
Sanding The Peel To Perfection
A smooth surface is vital for a peel that launches pizzas effortlessly. Begin with coarser sandpaper and graduate to finer grits. This progression removes rough spots and prepares the peel for a glorious finish. Use circular motions and sand along the grain for the best results.
- Start with 80-grit sandpaper.
- Progress to 120 grit, then 220 grit
- Sand until the surface is even and smooth
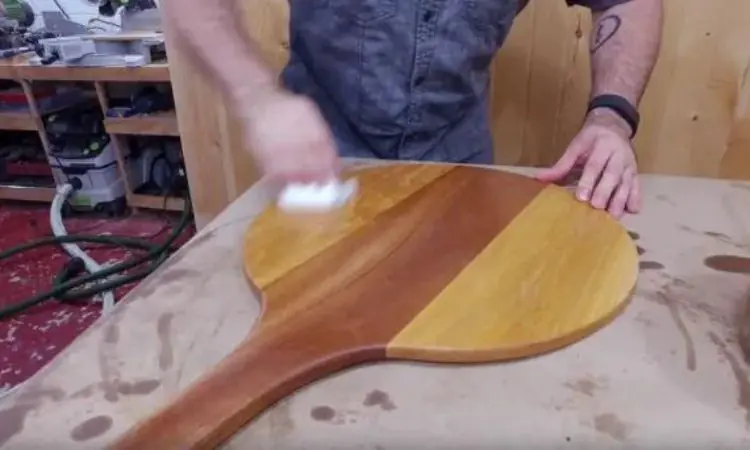
Applying Finish For Durability
A durable finish protects the wood and lends a professional touch. Food-safe mineral oil or butcher block conditioner are excellent choices. They seal the wood without introducing harmful chemicals. Please apply with a clean cloth, allow it to soak in, then wipe off the excess.
- Choose a food-safe finishing product.
- Apply liberally with a clean rag.
- Let it penetrate the wood for a few minutes
- Wipe away any excess product
Adding Perforations: A Step Further
If you want to elevate your peel, consider adding perforations. This advanced step helps reduce friction and prevent the dough from sticking. Drill small, evenly spaced holes throughout the peel’s surface. Remember, this is optional but can be a fun customization.
| Step | Instructions |
| 1 | Mark a grid for hole placement |
| 2 | Drill holes using a tiny bit |
| 3 | Sand the surface again to smooth any rough edges |
Using Your Homemade Peel
After crafting a top-notch pizza peel at home, the next step is to put it to good use. This durable creation aids in perfectly sliding pizzas in and out of the oven. Here are tips for using, maintaining, and exploring creative ways to utilize your peel.
Preventing Pizza From Sticking
To ensure smooth pizza transfers, start with a light dusting of flour or cornmeal on the peel’s surface. This creates a barrier that prevents the dough from sticking. Roll out the pizza dough, add toppings, and give the peel a slight shake to check if the pizza slides easily.
Maintenance And Care Tips
Keeping the peel in top condition is paramount for its longevity. Wash the peel by hand with mild soap and warm water. Thoroughly dry it to prevent warping and cracking. Occasionally sand the surface to remove stains and apply food-safe mineral oil to protect the wood.
- Clean after each use
- Avoid soaking in water
- Store in a dry, cool place
Creative Uses Beyond Pizza
Your homemade peel isn’t restricted to just pizza. Its flat surface makes it excellent for other culinary tasks. Use it as a cheese board, for serving appetizers, or even a cutting board. This versatility makes the homemade peel a kitchen tool and a conversation piece at gatherings.
| Use | Description |
| Bread Paddle | Transfer bread loaves to the oven with ease. |
| Charcuterie Board | Display meats, cheeses, and fruits for guests. |
| Decor | Enhance kitchen decor by hanging it on the wall. |
Frequently Asked Questions For How To Make A Pizza Peel At Home
How To Make Homemade Pizza Peel?
To make a homemade pizza peel, choose a hardwood like maple. Cut the wood to your desired peel size. Sand the edges smooth. Shape the handle for a comfortable grip. Finish with food-safe mineral oil for protection.
What Can I Use If I Don’t Have A Pizza Peel?
A baking sheet, parchment paper, a cutting board, or an overturned pan lid can replace a pizza peel for handling pizza.
What Kind Of Wood Do You Use To Make A Pizza Peel?
Hardwood such as maple is ideal for making a pizza peel due to its durability and resistance to bacteria.
What To Use To Make Pizza Slide-Off Peel?
Use cornmeal, flour, or parchment paper to easily make the pizza slide off the peel.
Conclusion
Crafting your pizza peel adds a personal touch to your pizza-making experience. Following the steps outlined has made it simple. Embrace the satisfaction of using a tool you made with your hands. Let it inspire your culinary creations! Remember, the best kitchen tools are those infused with the love of crafting and cooking.
Now, slice up that homemade pizza and serve it in style with your DIY pizza peel. Enjoy the fruits of your labor—one delicious slice at a time.

As the author of the “Ultimate Pizza Guide: Recipes, Tips & Secrets Revealed,” I’m dedicated to sharing my love for pizza and empowering others to create delicious homemade pizzas with ease. Join me on a journey to uncover the secrets to perfecting your pizza game!